

7 NATA Drawing Mistakes That Are Silently Costing You Marks - And Exactly How to Fix Each One
You have been practicing drawing every day for weeks. Your lines are cleaner, your shading is more controlled, and your compositions look better than when you started. So why is your NATA Part A mock score stuck at the same number? The answer is almost never lack of effort. It is almost always one of a small set of repeatable mistakes that self-study students make without realising - mistakes that evaluators notice immediately and that quietly pull scores down by 10, 15, even 20 marks. This guide names all seven of them, explains exactly why each one costs you marks in NATA drawing, and gives you a concrete fix you can apply in your very next practice session.
Why Do NATA Drawing Mistakes Go Undetected Until the Exam?
Most NATA drawing mistakes are invisible to the student making them. This is the core problem with solo preparation - you cannot evaluate your own work against the criteria an actual NATA evaluator uses. You see a completed drawing. The evaluator sees a spatial reasoning response to a specific brief. Those are two different things.
We identify seven mistakes that appear consistently in underperforming NATA drawing papers. Each one is fixable. None of them require exceptional artistic talent to correct. They require specific awareness and deliberate practice adjustments. Start applying fixes from your next session - not after the exam.
Mistake #1: Not Reading the Question Brief Carefully Enough
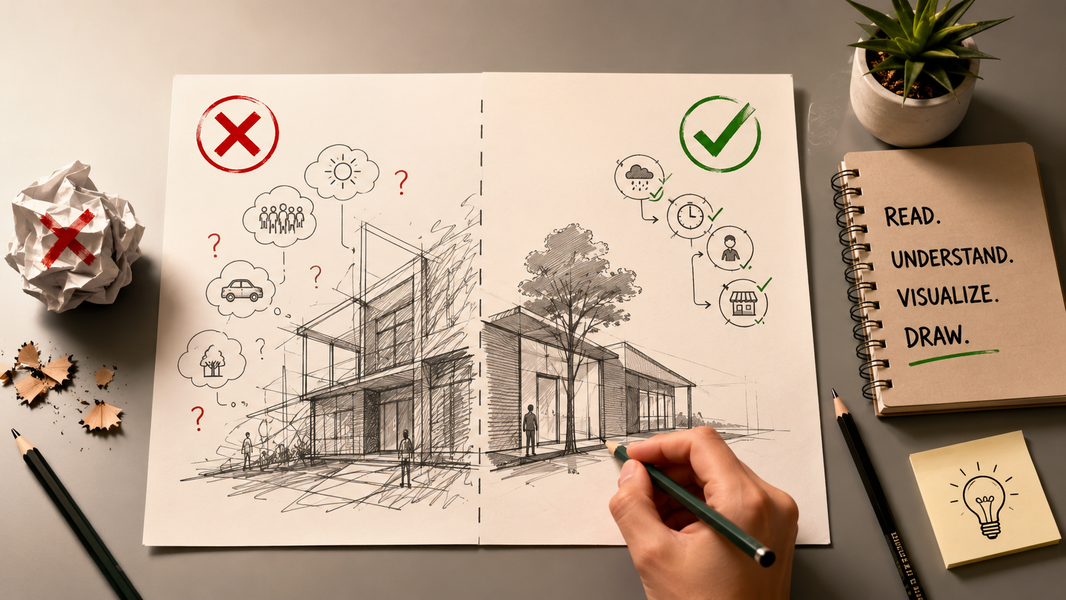
The mistake: A candidate reads "draw a street scene" and begins sketching a busy road with shops, people, and vehicles. The actual question said "draw a rainy street scene at dusk with one shopkeeper closing for the day." Three specific conditions - weather, time of day, and human activity - were ignored. The drawing is technically competent and completely off-brief.
This is the single most mark-damaging mistake in NATA Part A. It costs more marks than poor shading, weak perspective, or unfinished drawings combined, because it signals to the evaluator that the candidate cannot read and respond to a brief - a fundamental architecture competency.
Why it happens: Anxiety accelerates reading. Students scan the question rather than parsing it. The hand reaches for the pencil before the brain has processed the full prompt. Under time pressure, the brain grabs the most obvious visual interpretation and runs with it.
The fix: Before touching your drawing sheet, read the question twice. Underline every descriptive condition: mood, time, weather, specific objects, human presence, and setting. Count them. Write them in the margin of your rough sheet. Only begin drawing after you can name every condition the question specifies.
Practice this habit in every single mock session from today. It takes 90 seconds and is the highest-return habit in NATA drawing preparation.
Pro Tip: After underlining each condition, sketch one tiny symbol for each - a cloud for weather, a stick figure for human presence, an arrow for direction of light. This forces your brain to hold every condition simultaneously while you plan.
Common Mistake: Students who practice brief-reading correctly in calm mock conditions still revert to skimming under exam-day stress. Practice the underlining habit so automatically that it activates under pressure without conscious effort.
Mistake #2: Spending Too Long on One Corner and Running Out of Time
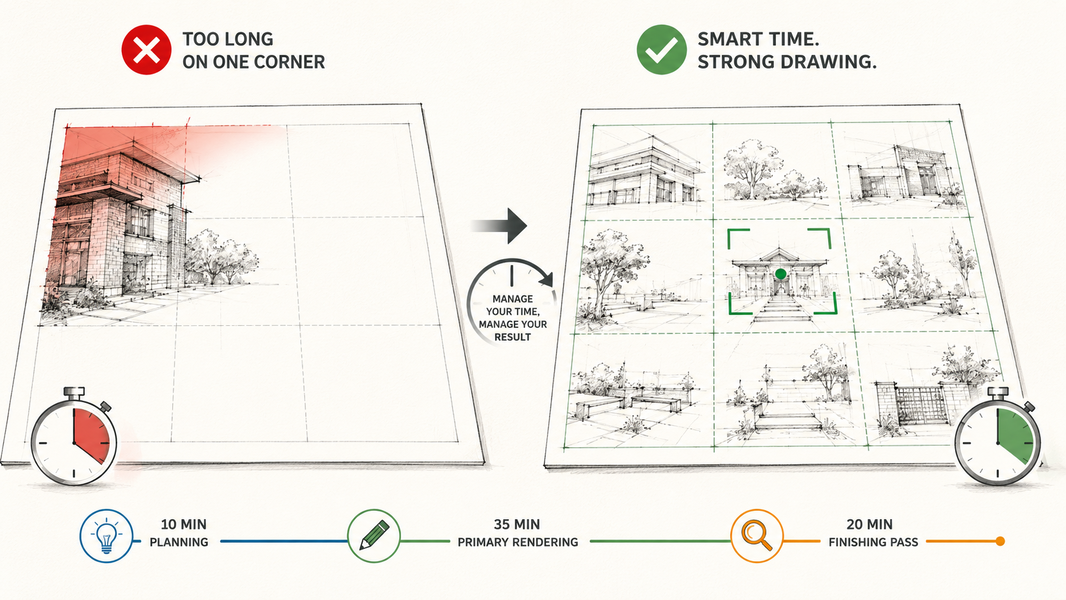
The mistake: The candidate begins in the top left of the sheet and renders it beautifully - detailed brickwork, careful hatching, precise linework. Twenty minutes in, they look up and realise three-quarters of the sheet is empty with fifteen minutes remaining. The final drawing has one stunning corner and three unfinished zones. Evaluators score the whole sheet, not the best corner.
Why it happens: Drawing feels safe when it is detailed. Beginners and intermediates both default to lingering in areas where they feel in control, unconsciously postponing the harder compositional decisions waiting in the blank zones of the sheet.
The fix: Use the 45-15-30 time split for every NATA drawing session.
Set a phone alarm or watch timer for each phase during practice. Do not move to the next phase early. Do not exceed a phase. The habit of structured time management in practice is the only thing that produces it under exam pressure.
Pro Tip: Divide your drawing sheet mentally into a 3x3 grid before you start. Each zone gets a defined element. No zone gets more attention than two zones combined.
Common Mistake: Students who know this rule still break it when they hit a zone they find engaging. The fix is mechanical - a timed alarm, not willpower.
Mistake #3: Copying Pinterest Drawings Instead of Observing Real Life
The mistake: The student's drawing folder is full of saved reference images - beautiful architectural sketches, urban watercolours, stylised street scenes. Their own drawings look like slightly degraded copies of those references: the same building typologies, the same perspective angles, the same human figure poses. Original visual thinking is absent.
Why it happens: Pinterest and Instagram references are aesthetically satisfying and psychologically safe. Copying a compelling image feels like learning. It is not. It is tracing someone else's visual decision-making rather than developing your own.
The fix: Replace reference-based drawing practice with observational drawing from your immediate environment for at least 60% of your sessions. Draw the view from your window. Draw the corner of your room. Draw the chai stall outside your building. Draw objects that are in front of you, not on your screen.
Observational drawing builds the skill NATA Part A actually tests: the ability to translate a verbal or conceptual prompt into an original visual response. Pinterest references train the eye to recognise beauty. Real-life observation trains the eye to construct it from scratch.
Common Mistake: Students confuse reference use with observational drawing. Looking at a building photo while drawing a building is still reference-based. Observational drawing means the object is physically present and three-dimensional.
Pro Tip: Spend 15 minutes every morning drawing one object in front of you, without any reference image. No timer pressure. Just observation. This single habit, sustained over eight weeks, produces more improvement than any technique tutorial.

Mistake #4: Skipping the Thumbnail Sketch Before Starting
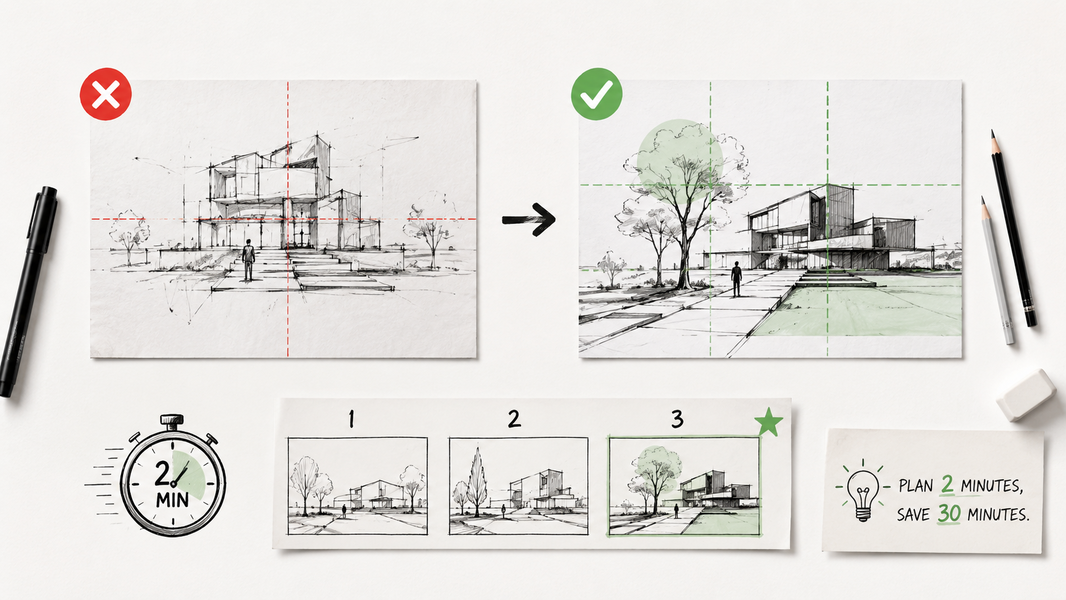
The mistake: The candidate begins drawing directly on the main sheet, making compositional decisions in real time. By the time they have committed two minutes of linework to the sheet, they realise their focal point is too central, their horizon line is at the wrong height, or their composition is unbalanced. Corrections on the final sheet are messy and visible. Starting over wastes time they do not have.
Why it happens: The thumbnail feels like wasted time under exam pressure. Students skip it to save two or three minutes and spend fifteen minutes correcting problems the thumbnail would have caught.
The fix: Mandatory thumbnail, every time, no exceptions. A thumbnail takes two minutes maximum. It is a 4x6 cm rough sketch in the margin of your rough sheet - not a detailed drawing, just a compositional map. Mark where the horizon line sits, where the focal point is, which zone carries the most detail, and where the human figures (if any) are placed.
Students who thumbnail consistently make fewer compositional errors, finish their sheets more completely, and score higher on spatial organisation - one of the explicit evaluation criteria in NATA Part A.
Pro Tip: Draw three different thumbnails for the same prompt before choosing one. The first is instinctive. The second corrects the first. The third is often the best. This takes four minutes and prevents thirty minutes of compositional regret.
Common Mistake: Students who thumbnail in practice skip it during the actual exam because they are nervous and feel time pressure more acutely. Make the thumbnail non-negotiable in every single mock session so the habit is automatic.
Mistake #5: Ignoring Proportion and Perspective Basics
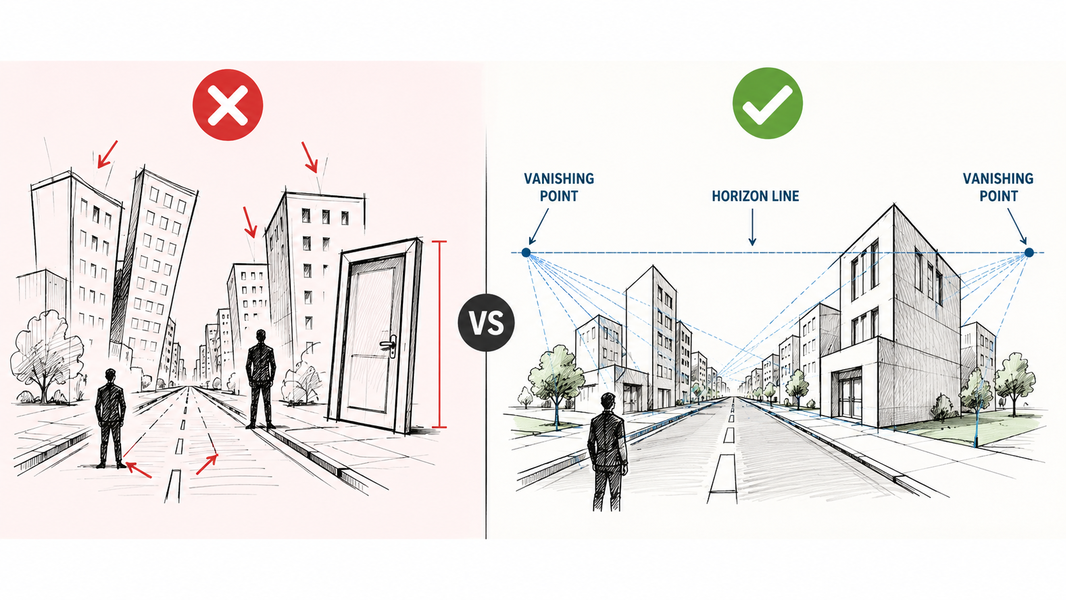
The mistake: Buildings lean inward at the top. Doors are taller than the buildings they belong to. The road narrows on the wrong side. People in the foreground are shorter than people in the background. The drawing reads as spatially confused, and the evaluator cannot tell whether the candidate understands three-dimensional space at all.
Why it happens: Proportion and perspective feel like technical rules that interrupt creative flow. Students who think of drawing as artistic expression rather than spatial communication resist the structural constraints of perspective. The result is drawings that look lively but communicate nothing coherent about space.
The fix: There are two fundamentals that solve 80% of perspective errors in NATA drawings.
First: fix your horizon line before drawing anything else. The horizon line is the viewer's eye level. Everything above it is seen from below. Everything below it is seen from above. Place it deliberately - typically at one-third from the top of the sheet for urban scenes, lower for scenes with expansive sky. Then stick to it.
Second: place your vanishing points before drawing any building or receding surface. In two-point perspective, both vanishing points sit on the horizon line. Every horizontal edge of every structure converges to one of those two points. No exceptions. This one rule, applied consistently, eliminates the leaning-building problem entirely.
Practice this as a ten-minute warm-up before every drawing session. Draw a box in two-point perspective. Then draw a room in two-point perspective. Then draw a street. The skill compounds quickly.
Common Mistake: Students understand perspective in theory but do not apply it when time pressure rises. Under exam conditions, they revert to approximate lines that look "about right." The fix is drilling the vanishing-point habit until it is faster to apply it correctly than to approximate.
Mistake #6: Overcomplicating the Composition
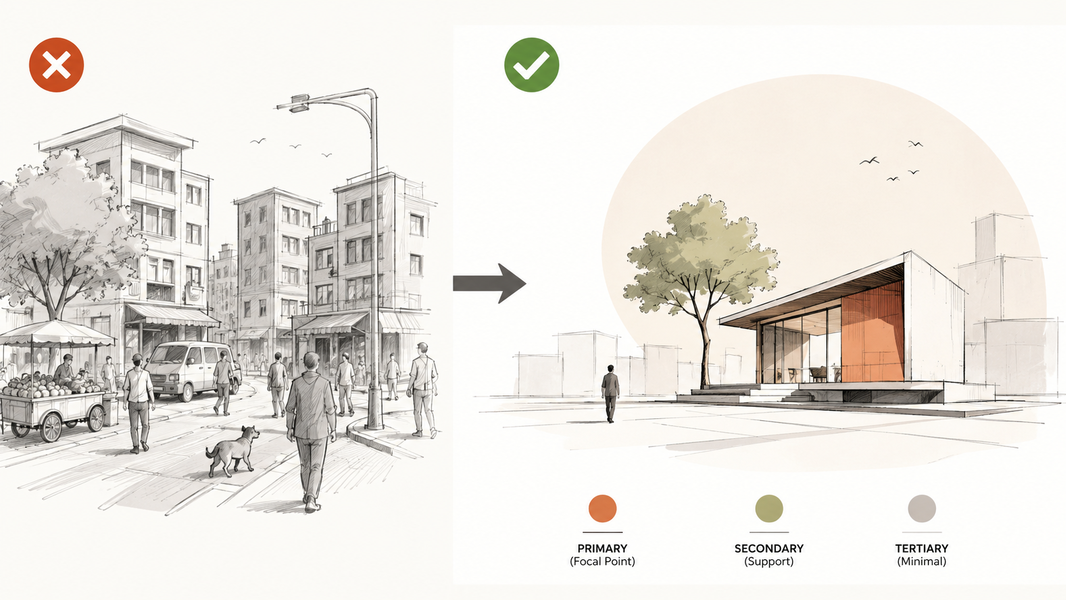
The mistake: The candidate includes a road, three buildings, a market, five pedestrians, a tree, a parked vehicle, street lighting, a food cart, and a dog. Every element is roughly equal in detail. The evaluator's eye has nowhere to land. The composition reads as chaotic, and the spatial hierarchy - one of the explicit evaluation criteria - is absent.
Why it happens: Students confuse visual complexity with visual richness. More elements feels like more effort, which feels like a higher score. In reality, NATA evaluators reward clarity of intention, not volume of content.
The fix: Apply the primary-secondary-tertiary hierarchy to every composition.
One primary element: the focal point. This receives the most detail, the strongest contrast, and the most deliberate placement (typically at one of the four golden-ratio intersections of the sheet, not dead centre).
Two to three secondary elements: these support the primary element and give the scene context. Rendered with medium detail. No element in this tier competes with the primary for attention.
Everything else is tertiary: suggested with minimal linework. Trees become a few overlapping curved lines. Background buildings become flat rectangular masses. People in the distance become stick-figure suggestions.
Pro Tip: After completing a drawing, hold it at arm's length and squint. Your eye should immediately go to the primary element. If it does not - if several things compete equally for attention - the hierarchy is broken. Adjust before time runs out.
Common Mistake: Students place their focal point in the dead centre of the sheet because it feels compositionally safe. Dead centre is the weakest position. Shift the focal element to the left or right of centre and let the secondary elements balance it from the opposite side.
Mistake #7: Preparing Only Drawing and Ignoring the Aptitude Section
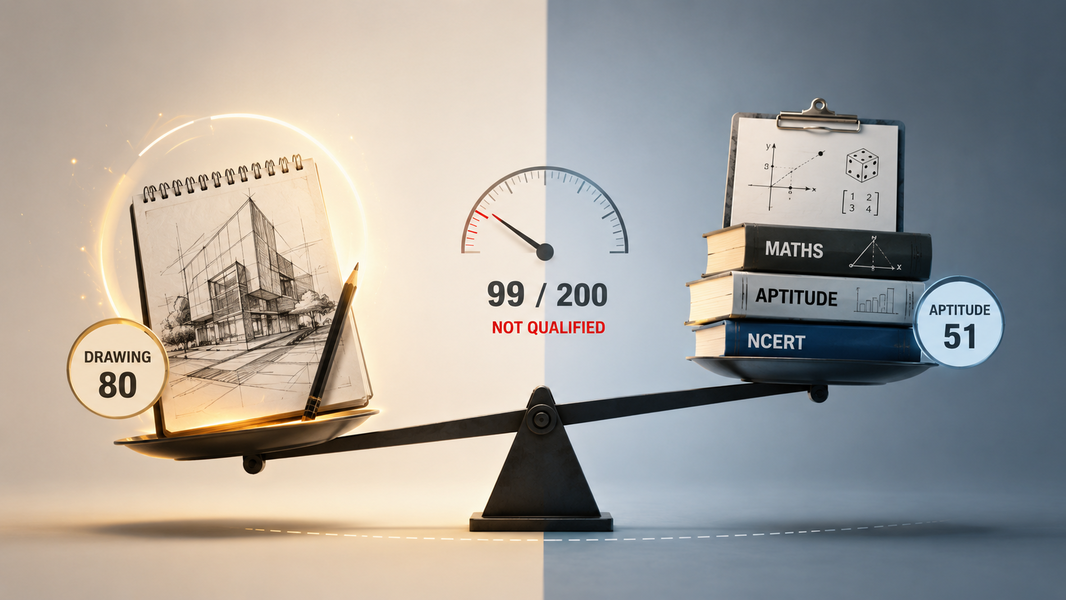
The mistake: The candidate spends three hours daily on drawing, practices compositions diligently, and develops genuine Part A skill. Then they attempt the full exam and score 48 out of 80 in drawing - a solid performance - but only 51 out of 120 in aptitude. Total: 99. The qualifying threshold is 110. The drawing preparation was excellent. The exam result was a fail.
Why it happens: NATA looks and feels like a drawing exam because the drawing section is what makes it different from other entrance tests. Students build their preparation identity around Part A and treat Part B as an afterthought. The marks distribution does not support this. Part B carries 120 of 200 total marks.
The fix: Restructure your daily schedule so Part B receives dedicated, non-negotiable time. The minimum effective dose is 60 minutes of mathematics and aptitude revision every single day, independent of your drawing session.
The Part B syllabus is entirely covered by NCERT Class 11 and 12. Prioritise: Coordinate Geometry, Matrices, Probability, Vectors, and Three-Dimensional Geometry for maths. For aptitude, work through NATA past papers section by section and build a topic-wise error log.
Pro Tip: Treat Part B like a board exam subject, not like a test you can wing. Students who score above 90 in Part B consistently have completed every NCERT exercise in their high-priority chapters, not just the examples.
Common Mistake: Students reduce Part B preparation in the final month because drawing anxiety increases as the exam approaches. This is exactly backward. Drawing improvement slows down in the final month as skill plateaus. Aptitude scores can still move significantly with focused two-week revision sprints.
HOW ARCHI LEARN'S STRUCTURED CRITIQUES FIX EACH MISTAKE
The seven mistakes above share one root cause: they are invisible to the student making them. You cannot see your own brief-reading errors because you believe you read the brief. You cannot identify your time management problem because you are inside it. You cannot diagnose your own compositional hierarchy failure because you are too close to your own drawing to see it as an evaluator does.
Archi Learn's drawing critique model is built specifically around this problem. Each critique session follows a structured evaluation rubric that maps directly to NATA Part A scoring criteria. Faculty do not give general feedback. They mark exactly where each of the seven failure patterns appears in your specific drawing.
For brief adherence (Mistake #1), the critique flags every condition in the question that did not appear in the response - not as a general comment, but as a marked annotation.
For time management (Mistake #2), Archi Learn's supervised mock sessions use a three-phase timer visible to the student throughout, creating the habit through external structure before it becomes internal.
For compositional hierarchy (Mistake #6), critiques include a side-by-side comparison of the student's drawing against a faculty-drawn reference at the same prompt - not to copy, but to calibrate. Seeing the difference between your hierarchy and a correct one is more instructive than any written explanation.
The students who improve fastest at Archi Learn are not the ones who arrive with the most talent. They are the ones who arrive with the most daily practice already in place - and who use the critique layer to convert effort into score.
What You Need to Know
The single highest-impact fix in NATA drawing is brief-reading discipline: underline every condition in the question before touching the sheet.
Time management in NATA Part A is a structural problem, not a speed problem. The 45-15-30 split prevents running out of time without requiring you to draw faster.
Observational drawing from real life builds the spatial skills NATA Part A tests. Pinterest references train aesthetic recognition, not original visual thinking.
The thumbnail sketch takes two minutes and prevents the most common compositional errors. Skipping it to save time consistently costs more time than it saves.
Composition quality is determined by hierarchy, not complexity. One strong focal element with clearly subordinate supporting elements will outscore a busy, detailed composition every time.
Part B carries 120 of 200 total marks. Students who score above 130 overall almost always have 80-plus in Part B - not just strong drawing.
Expert Note: The drawings that score highest in NATA Part A are rarely the most detailed. They are the most decisive. Evaluators review dozens of papers in a session, and the ones that hold attention longest are the ones where every mark on the sheet was placed with intention. A confident, slightly imperfect line reads better than a hesitant, technically corrected one. The evaluator is scoring the candidate's spatial communication, not their patience.
When These Fixes Are Not Enough: Honest Limitations
Correcting all seven mistakes through self-awareness and adjusted practice is possible - but only if you have an external check on your progress. The inherent problem is that the most serious mistakes (brief misreading, compositional hierarchy failure, perspective errors) are the hardest to self-diagnose because they require you to evaluate your own work as someone else would. If your mock scores are not improving after four weeks of applying these fixes, that is a clear signal to seek an external critique - not to practice more of the same.
CONCLUSION
NATA Part A is not a test of how beautifully you can draw. It is a test of how clearly you can communicate space, respond to a brief, and make intentional compositional decisions under time pressure. Every mistake on this list is a communication failure, not a talent failure - and every one of them is correctable with specific, targeted practice. Start with Mistake #1. Read the brief. Thumbnail before you start. Divide your sheet into zones. Keep Part B revision in your daily schedule. The score gap between where you are now and where you need to be is almost always smaller than it feels - it is just hidden inside these seven habits. To get a marked critique of your actual drawings against every point in this list, and find out exactly which of these seven mistakes is costing you the most marks right now.
Need help choosing the right coaching path?
Speak with Archilearn for exam planning, portfolio guidance, and the right study strategy for your goals.

Comment Section
No comments yet.